Sub-Total: £0.00
A Guide to Air Pistol Scopes & Sights: Enhancing Your Aim (UK)
Beyond the Factory Sights: Unlocking Your Pistol’s True Potential
There is a quiet satisfaction in an afternoon spent in the garden, a line of tin cans waiting patiently on a fence post, or the focused discipline of a 10-metre competition at the local club. Central to the enjoyment of air pistol shooting is the pursuit of accuracy. While most air pistols arrive equipped with functional iron sights, these standard fittings often represent the biggest bottleneck to achieving the firearm’s true potential. For any shooter looking to tighten their groups, improve consistency, and elevate their enjoyment of the sport, an upgraded optical sight is the single most transformative investment they can make.
This guide serves as a definitive resource for UK air pistol enthusiasts. It will demystify the world of optics, breaking down the key differences between traditional iron sights, fast-acquiring red dots, and precision-focused magnified scopes. By exploring the technical principles and drawing on real-world shooter experiences, this report will help you select the ideal sight for your specific needs, guide you through proper mounting and zeroing, and offer tips to master its use, ultimately allowing you to enhance your aim and unlock a new level of performance.
The Three Pillars of Pistol Sighting: A Comparative Analysis
Choosing an optic is not about finding a single “best” option, but about understanding a fundamental synergy between the shooter, the sight, and the shooting discipline. A shooter’s eyesight, their chosen activity—be it casual plinking or formal competition—and their skill level all combine to determine which sighting system will deliver the best results. A mismatch in any of these areas can lead to frustration, underscoring the importance of making an informed choice.
Iron Sights: The Foundation of Marksmanship
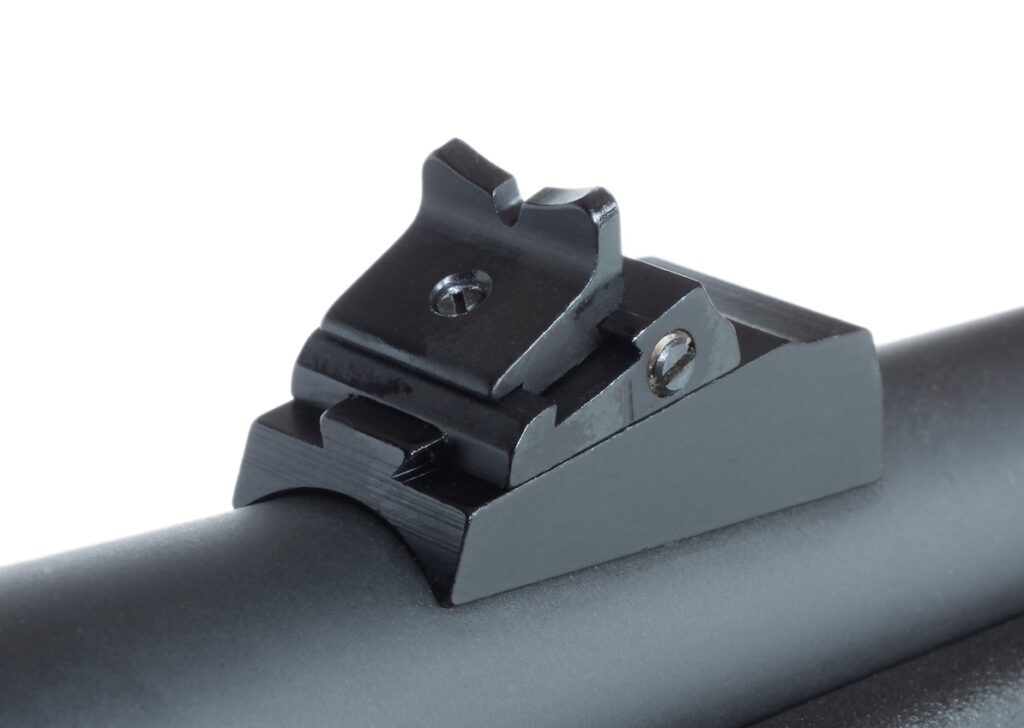
The traditional iron sight is the bedrock of shooting. Its principle is simple: align the rear sight, the front sight, and the target on the same visual plane. The challenge lies in the fact that the human eye cannot focus on all three points simultaneously. The correct technique requires the shooter to focus intently on the front sight, which means the rear sight and, crucially, the target itself will appear slightly blurry. This inherent complexity is the primary reason optics provide such a distinct advantage.
Advantages:
- Reliability & Durability: With no batteries to fail, no lenses to fog, and a mechanically simple design, iron sights are exceptionally robust and dependable in any condition.
- Skill Development: Mastering iron sights forces a shooter to perfect the fundamentals of marksmanship, including a stable hold, consistent trigger control, and proper breathing. Many UK shooting clubs require the use of “open sights” in certain competitions, making this a vital skill to learn.
- Cost-Effective: As the standard-issue option on most pistols, they are the most affordable sighting system available.
Disadvantages:
- Slow Target Acquisition: Aligning the four necessary points—the shooter’s eye, the rear sight, the front sight, and the target—is a deliberate and relatively slow process compared to modern optics.
- Limited Precision: At typical air pistol ranges, the front sight post can completely obscure a small bullseye or target, making precise shot placement difficult.
- Poor Low-Light Performance: Standard black iron sights become nearly impossible to align effectively in the low-light conditions of dawn, dusk, or in a shaded woodland environment.
For those dedicated to precision target shooting with iron sights, specialised options like the Air Arms Diopter Front Sight offer a significant upgrade over standard factory models.
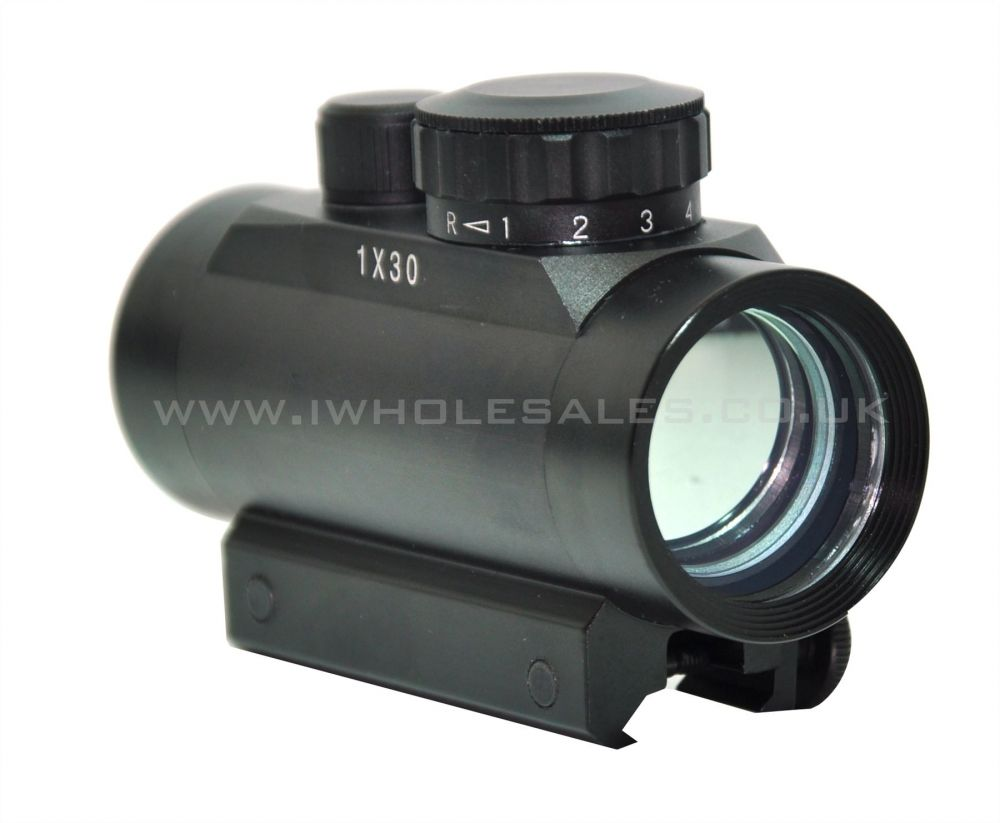
Red Dot & Reflex Sights: The Speed Kings

ACM 551 Scope with Red and Green Holographic Sight (Color Box – Tan)
Red dot sights operate on a “heads-up display” principle. An internal LED projects an illuminated dot onto a specially coated lens, which the shooter sees superimposed over the target. This elegantly simple system reduces the aiming process to just two focal planes: placing the dot on the target.
Advantages:
- Unmatched Speed: Their primary benefit is incredibly fast target acquisition. The shooter simply looks at the target, brings the dot into view, and fires.
- Superior Situational Awareness: Red dots are designed to be used with both eyes open. This provides an unlimited field of view, allowing the shooter to remain aware of their surroundings—a significant advantage in dynamic shooting disciplines.
- Forgiving & Intuitive: With unlimited eye relief and minimal parallax error, red dots are very forgiving of slight variations in head position. This makes them exceptionally easy for new shooters to learn and master.
- Ideal for Plinking and Action Shooting: For the dynamic fun of shooting at reactive targets like tin cans or steel plates, the red dot is the undisputed champion.
Disadvantages:
- Battery Dependent: The sight requires a battery to function. A dead battery renders the sight useless, which can happen at the most inconvenient times.
- Precision on Small Targets: The size of the dot, measured in Minutes of Angle (MOA), can be a limitation. A larger dot that is easy to see for plinking may completely cover the bullseye in a 10-metre target competition, hindering precision.
- Astigmatism Issues: A significant number of shooters have astigmatism, an imperfection in the eye’s curvature. For these individuals, a red dot may not appear as a crisp point but as a blurry “starburst” or comet shape, making accurate aiming difficult or impossible.
Huntsman Sports offers a variety of options in this popular category, including the ACM Tactical Mini Red Dot Sight and various holographic sights, catering to different budgets and applications.
Magnified Scopes: The Precision Instruments
ACM 1×40 Red/Green Dot Scope (Black)
A pistol scope is essentially a compact refracting telescope engineered with very long eye relief, allowing it to be held at arm’s length and still provide a clear sight picture.
Advantages:
- Maximum Precision: By magnifying the target, a scope allows the shooter to see their aiming point with exceptional clarity. This enables the highest possible degree of accuracy, especially at the longer end of air pistol ranges.
- Positive Target Identification: For pest control, magnification is invaluable. It allows the shooter to confirm their target with certainty and ensure the backstop is safe before taking a shot.
- Advanced Reticles: Many scopes feature reticles with additional aiming points, such as Mil-Dots. These allow a skilled shooter to estimate range and compensate for the natural drop of the pellet over distance (a technique known as “holdover”).
Disadvantages:
- Magnified Wobble: This is the single greatest challenge when using a scope on a pistol. The magnification not only makes the target appear closer, but it also amplifies every slight shake and tremor of the shooter’s hands. For those without a rock-steady hold, this can be visually distracting and detrimental to accuracy.
- Narrow Field of View: The view through a scope is significantly more restricted than with a red dot. This makes it more difficult to find and track moving targets or to acquire a target quickly.
- Weight and Bulk: A scope and its mounts add considerable weight and bulk to a pistol, altering its balance and handling characteristics.
- Parallax Error: This optical effect is a critical consideration for any airgun scope and is a major factor that must be addressed when making a purchase.
The Huntsman Sports catalogue includes a range of magnified scopes suitable for air pistols, from the versatile ACM 3-9x32EG to dedicated pistol scopes like the PAO 2×20.
A Practical Buyer’s Guide: Matching the Optic to Your Mission
With a clear understanding of the fundamental differences between sight types, the next step is to align their characteristics with your specific shooting activities. The following table provides a quick-reference summary to help orient your choice.
Table 1: Sight/Scope Comparison at a Glance
| Sighting System | Primary UK Use Case | Key Advantages | Key Limitations |
| Iron Sights | Formal 10m target competitions (where required), skill development | Ultimate reliability, no batteries, builds fundamental skills | Slow, complex sight picture, poor in low light |
| Red Dot/Reflex | Garden plinking, steel plate/action shooting, close-range pest control | Extremely fast, both-eyes-open shooting, intuitive, forgiving | Battery-dependent, can obscure small targets, problematic for astigmatism |
| Magnified Scope | Precision target shooting (any-sight class), longer-range pest control | Highest potential accuracy, target magnification, holdover capability | Magnifies shooter wobble, narrow field of view, heavy, requires parallax adjustment |
Discipline-Driven Choices for the UK Shooter
- For the Garden Plinker: The clear recommendation is a Red Dot or Reflex Sight. Plinking is about having fun with reactive targets, and the speed, wide field of view, and intuitive nature of a red dot are perfectly suited for quickly transitioning between spinners, tin cans, and other targets. A wide range of affordable models provides excellent performance for this popular pastime.
- For the 10-Metre Target Shooter: This discipline, popular in UK clubs, demands absolute precision. While some competitions mandate the use of “open sights” , many have “any sight” categories. For these, the best options are either a red dot with a very small dot size (e.g., 2-3 MOA) or a low-power (e.g., 2x) long eye relief pistol scope. A large dot can obscure the entire bullseye, whereas the fine crosshairs of a scope or a small, precise dot allow for a more refined aiming point. The choice often comes down to personal preference and whether the shooter can manage the magnified wobble of a scope.
- For Close-Range Pest Control: When using an air pistol for tasks like controlling rats in a farmyard, the choice is between a robust red dot sight and a clear, low-power scope. The decision hinges on a trade-off between speed and identification. A red dot allows for very fast target acquisition, but a scope’s magnification can be crucial for positive target identification in low-light conditions, ensuring an ethical and safe shot.
Decoding the Jargon: What the Numbers Really Mean
The world of optics is filled with technical terms and numbers. Understanding these is key to making a wise purchase.
- Magnification & Objective Lens (e.g., 2×20, 3-9×40): In a scope’s designation, the first number or range (e.g., ‘2x’ or ‘3-9x’) refers to its magnification power. A ‘2x’ scope makes the target appear twice as close. A ‘3-9x’ scope has variable power, adjustable from three to nine times magnification. For pistols, lower magnification is generally preferred to minimise the effect of hand shake. The number after the ‘x’ (e.g., ’20’ or ’40’) is the diameter of the objective lens (the one facing the target) in millimetres. A larger objective lens gathers more light, creating a brighter image, but also adds weight and may require higher mounting rings.
- The Parallax Problem: A Non-Negotiable for Air Pistol Scopes: Parallax is an optical effect where the reticle (crosshairs) appears to shift its position on the target if the shooter moves their eye slightly off-centre from the eyepiece. This occurs when the target and the reticle are not on the same focal plane. This is critically important for airgunners because most standard rifle scopes are set to be parallax-free at 100 yards or more. When such a scope is used at typical air pistol distances of 10-30 yards, the parallax error can be so significant that it causes consistent misses, even with a perfect hold. The solution is to only purchase a scope that has parallax adjustment. This feature is usually designated as Adjustable Objective (AO), a ring on the bell of the scope, or Side Focus (SF), a third turret on the side. This adjustment allows the shooter to focus the scope precisely at the target’s distance, eliminating parallax error and ensuring the point of aim is true. Products like the ACM 3-9x40AOEG Sniper Scope explicitly feature this “AO” capability, making them suitable for the close-range work of air pistols.
- Reticles & Dot Sizes (MOA): The reticle is the aiming pattern inside a scope. Common types include the Duplex, with thick outer posts that narrow to fine crosshairs, and the Mil-Dot, which has dots along the crosshairs to help with range estimation and holdover. For red dot sights, the size of the dot is measured in Minutes of Angle (MOA). One MOA subtends approximately 1 inch at 100 yards, which translates to a much smaller 0.1 inches at a 10-yard pistol range. A smaller MOA dot (2-3 MOA) is better for precision target work as it covers less of the target, while a larger dot (5-6 MOA) is faster for the eye to acquire for plinking.
The Practical Masterclass: Mounting & Zeroing Your Optic
Even the finest optic will perform poorly if not installed correctly. Poor accuracy after fitting a new sight is very often not due to a faulty product or poor shooting, but rather a cascade of small errors that begin with the mounting process itself. An improperly fitted mount can make a scope impossible to zero, leading to immense frustration. Taking a meticulous, step-by-step approach here is the key to success.
Mounting Systems: Dovetail vs. Picatinny/Weaver
Air pistols use one of two main systems for attaching optics.
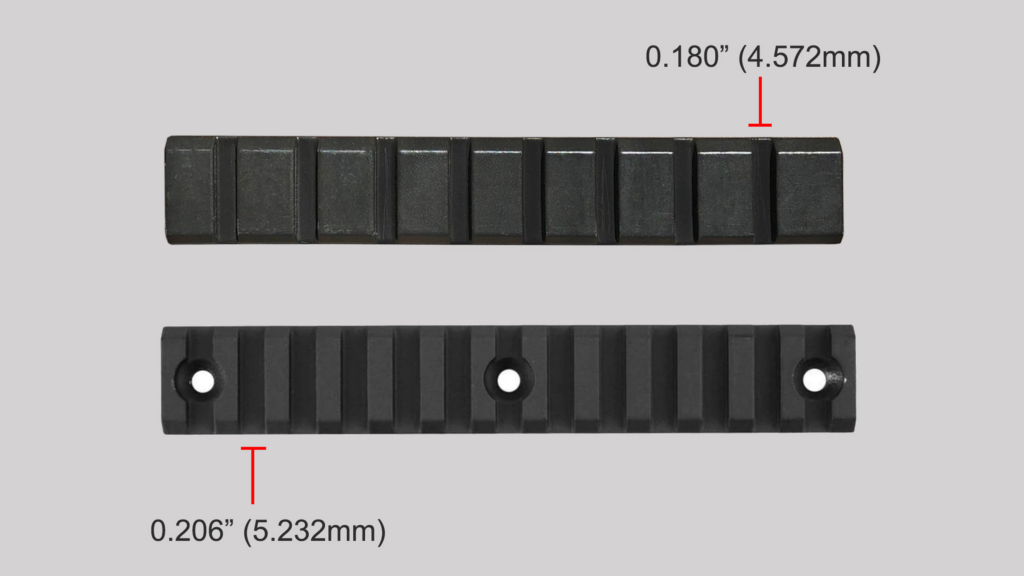
- Dovetail Rails: This is the traditional standard on most airguns in the UK. It consists of two parallel grooves, typically 11mm wide at their widest point. While they offer a low profile and allow for very fine adjustment of scope position, they are less secure and can suffer from “scope creep”—the sight shifting under recoil, a particular problem for spring-piston pistols. Furthermore, a lack of strict standardisation means some manufacturers (like BSA and Gamo) use wider 13mm rails, which can cause compatibility issues with standard 11mm mounts.
- Picatinny/Weaver Rails: This modern system features a wider rail with perpendicular slots. It is extremely secure, prevents any possibility of creep, and allows for optics to be removed and reattached with a high degree of zero retention. While bulkier, it is a more robust and standardised system.
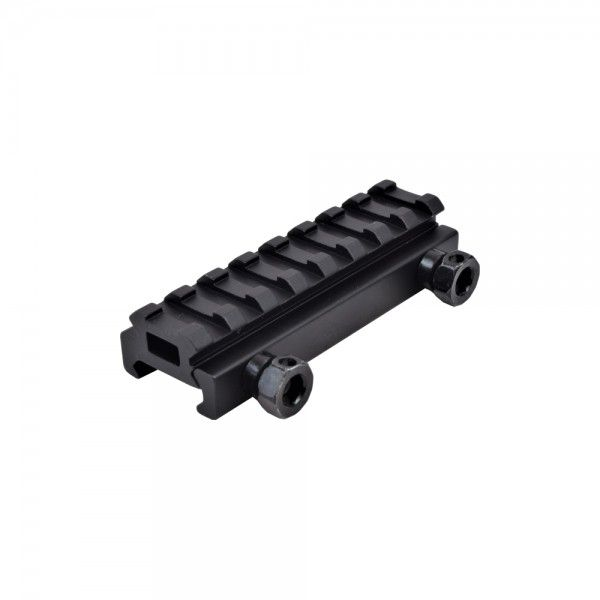
For shooters with a dovetail-railed pistol who wish to use a Picatinny-based optic, simple and affordable adapters like the ACM Dovetail to Weaver Picatinny Rail Adapter are available, providing a secure and versatile solution.
Step-by-Step Installation Guide
Safety First: Before beginning, always ensure the air pistol is safe, unloaded, and uncocked. Adhere to safe handling practices at all times.
- Mount the Bases: Separate the top and bottom halves of your scope rings. Loosen the screws on the base clamps and fit them loosely onto your pistol’s rail. A common error occurs here: many dovetail mounts have a reversible clamping plate to fit different rail widths (e.g., 9mm or 11mm). Ensure this plate is oriented correctly for your pistol to prevent the mount from sitting at an angle when tightened.
- Position the Scope for Eye Relief: Place the scope body into the lower rings. Now, hold the pistol in your natural shooting stance. Move the scope forwards or backwards within the loose mounts until you see a full, clear sight picture with no black crescents around the edge. This critical distance is called eye relief. Once you find the perfect spot, lightly tighten the mount bases to the rail.
- Level the Reticle: It is vital that the scope’s vertical crosshair is perfectly aligned with gravity. If it is canted, your shots will drift to the left or right at distances other than your zero range. To level it, first ensure the pistol itself is perfectly level in a rest or vice. Then, looking through the scope at a known vertical line (like a plumb line or a door frame), carefully rotate the scope tube until the vertical crosshair is perfectly aligned with it.
- Final Tightening: Place the top halves of the rings back on the scope. Tighten the screws incrementally in a diagonal (X) pattern, applying even pressure to each screw. This prevents stressing or damaging the scope tube. The screws should be firm, but do not overtighten, as this can crush the tube and damage the internal mechanisms. For maximum security, especially on recoiling pistols, applying a small drop of removable thread-locking compound to the screw threads is recommended.
The Art of Zeroing: Aligning Sight with Impact
“Zeroing” is the process of adjusting the sight so that your point of aim (where the reticle is pointing) aligns perfectly with your point of impact (where the pellet hits) at a chosen distance.
- Preparation:
- Choose a Zero Distance: For most UK air pistol shooting, 10 yards is an excellent and manageable distance to start with.
- Use a Stable Platform: To eliminate shooter error, the pistol must be fired from a solid rest, such as sandbags or a dedicated shooting stand. You are zeroing the pistol and sight, not testing your own steadiness.
- Ensure a Safe Backstop: Always be sure of your target and what lies beyond it.
- The Process: Shoot, Measure, Adjust, Repeat
- Fire a Group: From your stable rest, aim at the exact centre of a paper target and carefully fire a group of 3 to 5 shots. A group provides a much more reliable average point of impact than a single shot.
- Measure the Difference: Observe the centre of your shot group. Note its position relative to the bullseye (e.g., “1 inch low and 2 inches to the right”).
- Adjust the Turrets: Your optic will have two adjustment dials, or turrets. The top turret adjusts Elevation (up/down), and the side turret adjusts Windage (left/right). The key principle is to turn the turret in the direction you want the pellet impact to move. If your group is hitting low, you dial the Elevation turret in the direction marked “UP”. If your group is hitting to the right, you dial the Windage turret in the direction marked “LEFT”.
- Confirm and Refine: Fire another 3-5 shot group. It should be closer to the centre. Repeat the process, making finer adjustments, until your groups are consistently hitting the bullseye.
From Good to Great: Honing Your Aim
With a properly mounted and zeroed optic, the hardware is no longer the limiting factor—the final variable is the shooter. An advanced sight cannot compensate for flaws in fundamental technique.
Beyond the Gear: Correcting Common Shooting Errors
- Improper Grip: A firm and, most importantly, consistent grip is essential for controlling the pistol. A loose grip allows the gun to move unpredictably during the firing cycle, leading to inconsistent shots.
- Jerking the Trigger: Perhaps the most common shooting error is yanking the trigger instead of squeezing it. The trigger pull should be a smooth, steady, rearward pressure that continues until the shot breaks as a surprise. A sudden jerk will pull the pistol off target at the last moment.
- Anticipating the Shot (Flinching): This is a subconscious reaction where the shooter tenses their muscles and pushes the pistol down and forward just before the shot, anticipating the noise and recoil. A useful diagnostic tool is the “ball and dummy” drill: have a friend randomly load either a live pellet or leave the chamber empty. When you pull the trigger on an empty chamber, any flinch will be immediately obvious.
- Follow-Through: A critical but often overlooked fundamental. Follow-through means maintaining your grip, stance, and sight picture for a moment after the shot has been fired. This ensures that you do not disturb the pistol while the pellet is still travelling down the barrel.
A Final Word on Safety: The Cardinal Rules
Airguns are not toys and must always be handled with the same respect and caution as any firearm. Adhering to the fundamental rules of safety is non-negotiable.
- Treat every gun as if it is loaded.
- Never point the muzzle at anything you are not willing to destroy.
- Keep your finger off the trigger and outside the trigger guard until your sights are on the target and you have decided to shoot.
- Be absolutely sure of your target and what is beyond it.
Conclusion: Your Path to Perfect Placement
The journey to greater accuracy with an air pistol is both rewarding and achievable. It begins with a clear-eyed assessment of your needs, matching the type of sight—be it rugged iron sights, fast red dots, or precise scopes—to your primary shooting discipline and your own eyesight. For magnified scopes, the inclusion of parallax adjustment (AO or SF) is not a luxury but a necessity for the typical ranges at which air pistols are used.
From there, success is built upon a foundation of meticulous care. A properly mounted, levelled, and torqued optic is the prerequisite for a successful zeroing session. By following a methodical process of shooting, measuring, and adjusting from a stable rest, you can perfectly align your sight with your pistol’s point of impact. This investment in time and attention to detail pays dividends every time you step up to the firing line. Mastering an optic transforms the shooting experience, building confidence and deepening the enjoyment of the sport.
To begin your own journey towards perfect placement, we invite you to explore the curated selection of air pistol sights and scopes at Huntsman Sports. Our range of optics and accessories is chosen to meet the needs of every UK shooter, from the garden plinker to the serious competitor.
Check out our articles on:
How to maintain your air pistol .
Discover the top 5 air pistol FAQs in the UK.
Discover the top 3 glock air pistols .
Discover the best spring-powered air pistols .
Discover the best PCP air pistols .
How to choose your first air pistol.
Discover the best air pistol for rats.
How to improving air pistol accuracy.
Discover the best air pistol scopes and sights.
udenafil reddit
udenafil reddit
topamax dosage forms
topamax dosage forms
rybelsus semaglutid tabletter
rybelsus semaglutid tabletter
sildenafil 100 mg tablet reviews
sildenafil 100 mg tablet reviews
cialis tadalafil
cialis tadalafil
oral minoxidil amazon
oral minoxidil amazon
terbinafine dosage resource
terbinafine dosage resource
ivermectin ADME
ivermectin ADME
minoxidil foam vs liquid analysis
minoxidil foam vs liquid analysis
minoxidil duration timeline
minoxidil duration timeline